UWM Mixed Media - Found Item |
|

|
Exhibition Text
Title: Hidden Intentions
Medium: Found Item Size: 21.3 cm x 12.5 cm Time of Creation: January 2018 Consisting of broken and burned aluminum shards, Hidden Intentions is a found item, mixed media piece that is primarily inspired by recent sculpture: Lorenzo Quinn. Several combinations of textures and abstract work from Quinn’s sculptures are showcased within my piece, as they aid in the conceptual expression of the underlying, and often abusive, intentions within a relationship. Furthermore, Hidden Intentions showcases contrasting emotions of love and hostility through shape and texture. |
Critical Investigation/Artistic Inspiration
|
My primary artistic inspiration for this mixed media piece specifically comes from the contemporary artist: Lorenzo Quinn, with a majority of my inspirations coming from his plethora of sculptures. Born the year of 1966, Lorenzo Quinn originated from the city of Rome, yet consistently traveled between the United States and Italy with his family. However, it was primarily Quinn’s time in Rome that ultimately lead to his discovery of the arts, and furthermore his appreciation of it. Several years later, Quinn attended the American Academy of Fine Arts in New York. While initially attending the Academy, Quinn heavily focused on becoming a Surrealist painter, but gradually began to work with sculpting until the year of 1989, in which Quinn realized that he had found his prefered medium. It was also during this time that Lorenzo Quinn married Giovanna Cicutto, and moved to Spain with her and their first child.
While in Spain, Lorenzo briefly dabbled in an acting career - of which also happened to be his father’s career - yet felt unsatisfied with the work and eventually returned his focus to sculpting. In these following years, Quinn officially began his career as a figurative sculpture, and throughout his work received commissions from the United Nations, the Vatican, and the Absolut Vodka ad campaign. This set of international commissions only increased Quinn’s reputation amongst the New York art community, and provided him several opportunities to create a multitude of publicly shown sculptures. This abundance of sculptures from Lorenzo Quinn made him a valuable inspiration, as I could easily access the numerous artworks to influence my own work. Additionally, it was Quinn’s common usage of metal that ultimately made me interested in using his pieces, as I was able to see examples of how Quinn was able to manipulate the appearance of metal within his works. This ultimately gave me a general idea of what I could make within my sculpture using typically rigid materials. |
|
Planning Phase
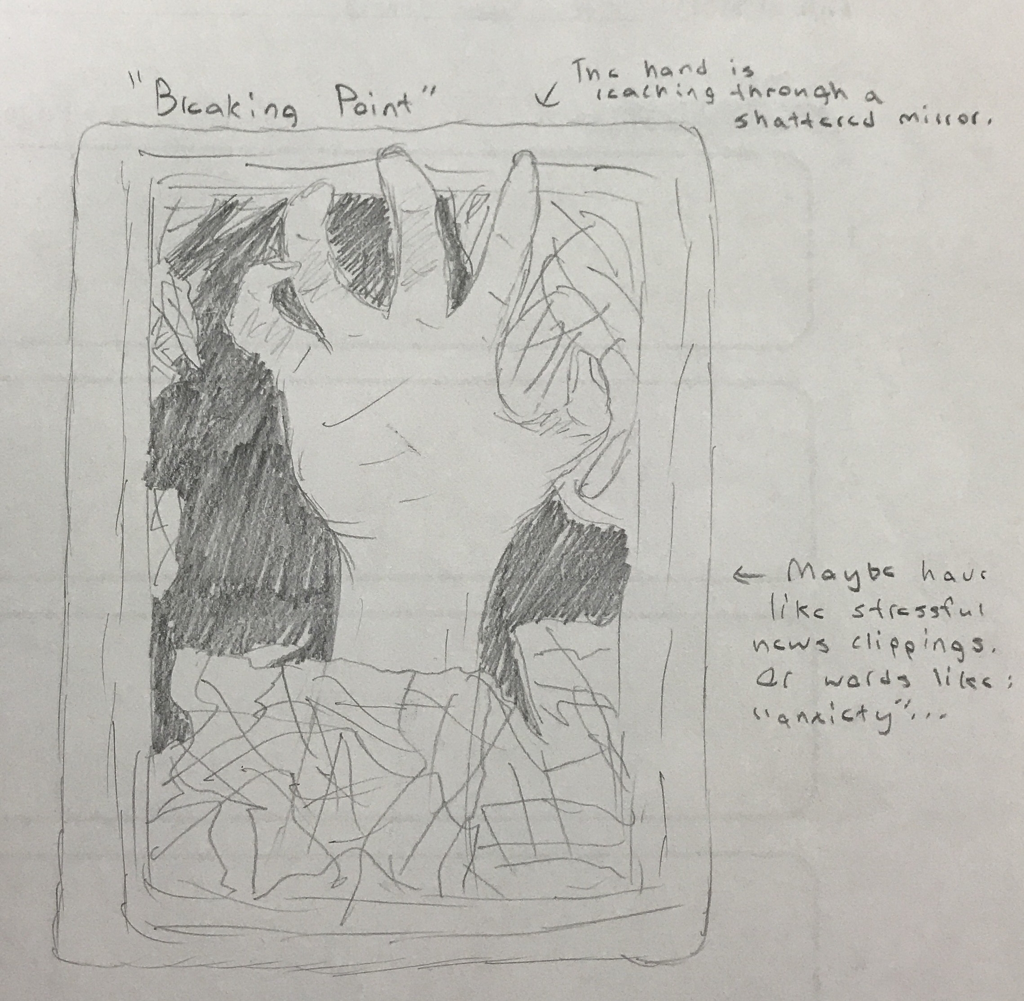
Concept Sketch #1
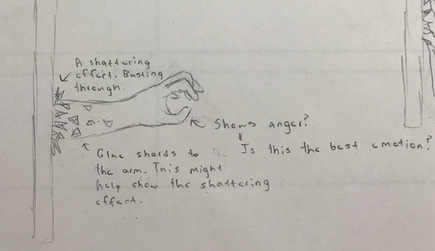
Concept Sketch #2
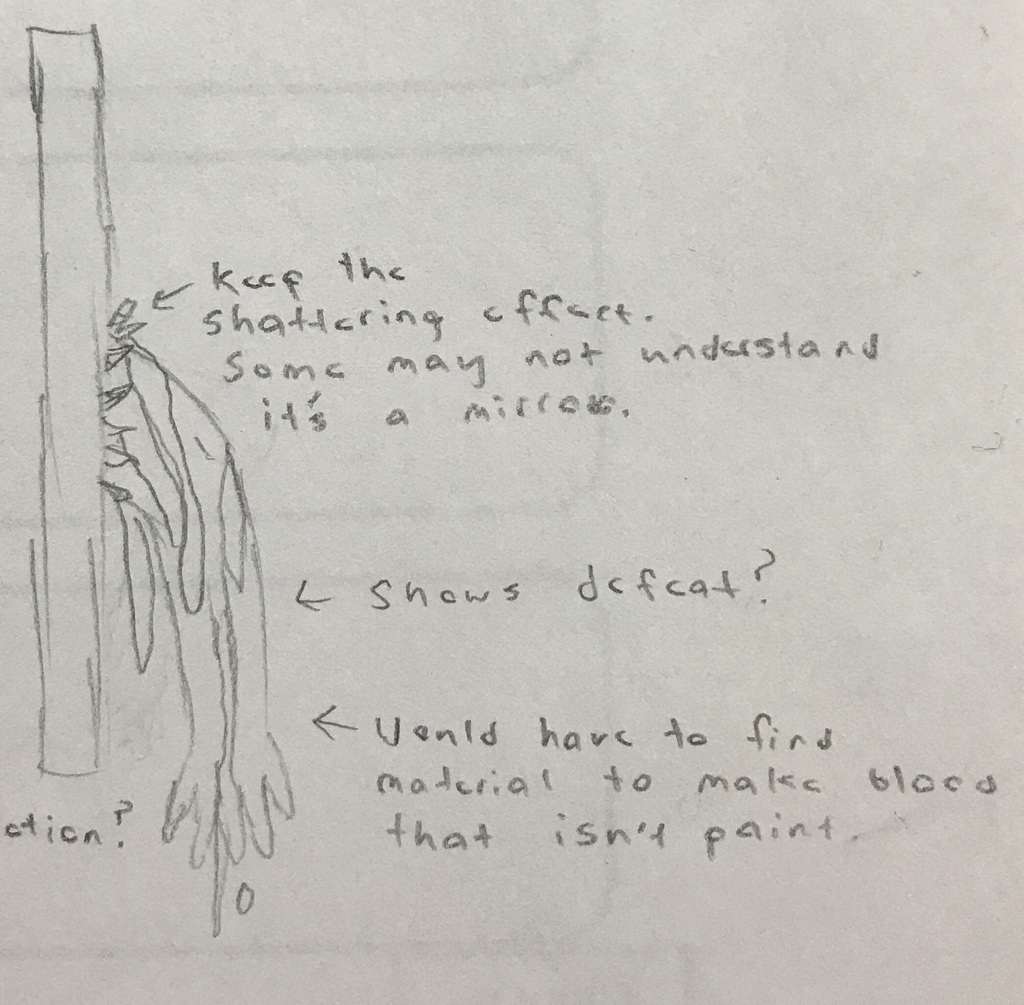
Concept #3
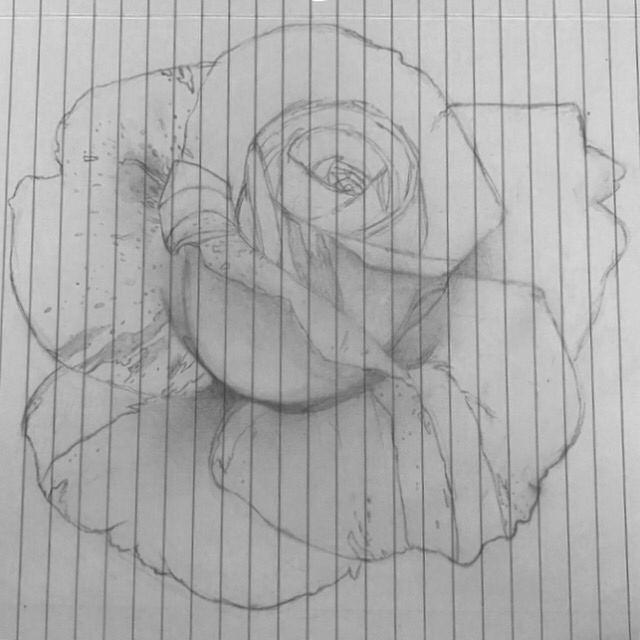
Concept #4 (Final sketch)
|
When initially considering possible ideas for my sculpture, I constantly referred to the requirements of the project itself. This was done to ensure my ideas followed the various guidelines of the mixed media prompts, and furthermore, to ensure that my idea could be completed in the given timeframe. Before I began sketching images for my project, I brainstormed multiple themes that I could use to connect this sculpture to my previous works. From this idea, I then progressed by discovering different ways I could abstractly represent human emotions through a limited set of materials. My first - and final - general idea was to showcase sensory overload through the extreme use of reflective materials that have been packed into a considerably small space. This large amount of reflective material would then represent the overwhelming feeling of having the body’s senses over-stimulated by the surrounding environment, as the multiple reflections would confuse the viewer. This first image is a detailed sketch of what I intended the whole piece to look like. Although it should be noted that at this time I didn’t know what frame I would be given by grandparents. They had already told me they had one I could use, but didn’t explain the appearance, so I made the decision to draw the frame without intricate details.
This next sketch is based off my original sketch for this project, only it attempts to show the piece from another angle. As I began developing my sketches, I desired to plan out the sculpture from multiple - yet only the most vital - perspectives. This was desired because the sculpture would be 3D, and therefore could not be arranged into a high-quality physical piece if my sketches only covered one viewpoint of the project. Additionally, this sketch was created in an attempt to better see what positioning of the arm would most efficiently express the theme within my piece. The arm I would be using for this piece was intended to show the effects of sensory overload on an individual. This first image is supposed to show anger, and general annoyance that a person feels during sensory overload. Yet, this idea was ultimately discarded, as I felt that the arm’s positioning could be misinterpreted as other emotions (the most common one being desperation, more specifically, the desperation to escape). My third - and original - final sketch for this piece continues to attempt to showcase different emotions through the positioning of an arm on my frame. Although, this final sketch showcases a bloody and limp arm, of which is intended to showcase defeat after the senses have been overwhelmed by the surrounding environment. I preferred this idea over the previous one, as I found this positioning of the arm conveyed a very strong and distinct emotion. Following the in-progress critiques we had within my class, I felt completely lost for sculpture ideas. My original idea wasn’t strong enough, and even bordered on the fringe of being cliche. These combined ideas of a weak theme, as well as a cliche mixed media piece, I started creating sketches for an entire new piece. I purposefully made these sketches of different items than what I had originally brainstormed, as I wanted to distance myself from the ideas that were badly criticized. This new approach to creating a project was difficult, yet at the same time, it was interesting being able to design ideas for an entirely new piece in a medium I had not yet worked with. I ultimately decided on creating a flower, yet using sharp and broken metal shards to showcase this idea of hidden intentions in relationships. The flower itself provided this idea of outward appearances and love, while the metals making up the flower contrastingly showcase a cold and hostile emotion that cannot always be seen under the surface of relationships. This was the first and final initial sketch of this piece before I decided to begin creating the project itself. |
Process
Once I had gathered a considerable amount of aluminum cans, I ultimately started this process by cutting the cans into multiple sheets of various sizes. This provided me with multiple materials to make the different components of my flower, of which I could easily bend and experiment with. To begin cutting the cans, I would initially take a pair of heavy-duty pliers, and begin to cut through the top segment of the can. I would do this by taking the pliers, and placing them with one side inside the opened portion of the can, and the other along the outside rim of the same can. Doing this made it considerably easier to simply “push down” on the pliers, of which provided enough forced to break the thicker rim of metal around the top edge of the can.
After the top rim has been cut, I then would take a small pair of regular scissors, and begin cutting in a straight line down the center of the can. I would cut until I reached the other end of the can, after which, I would rotate the scissors approximately 90 degrees, and proceed to remove the bottom portion of the can as well. This unusable piece of metal was then discarded, and placed onto a paper plate with other similar pieces of metal. I decided not to use either the top or bottom of the can, as I felt that both had very little pliability to them, of which would ultimately hinder the appearance of my flower sculpture. Additionally, it should be noted that around this time in the process of cutting my cans, I would turn the sink on and run warm water into the cans. Not only did this clean the residue from within the can, but it also heated up the metal slightly, of which allowed me the opportunity to manipulate and bend the metal as I desired.
Once the bottoms of the cans had been cut off, I would then take my scissors and return to the upper end of the cut can. I would then similarly cut horizontally along the can, of which allowed me to easily remove the clunky metal pieces from the top sections of the can. These removed can tops were then also discarded onto the paper plate, along with the unused bottoms. Following the removal of both the can top and bottom, I was then able to cut the remaining sheet of aluminum to my liking. As I continued through this process, I ensured to make a wide variety of metal sheets, as I wanted to be sure I had enough to assemble the different components of my sculpture. Some sheets were cut into long, thin strands to be used as a makeshift stem; while other pieces were cut wide and somewhat short, as they would be used to form the petals and leaves along the plant. I would simply use the scissors to cut these different metal sheets, as the aluminum metal was thin, and easy to cut. Using small scissors also provided me with an advantage throughout this process, as the tool itself isn’t incredibly hard to use, and therefore I was able to alter the shape of the metal in a quicker fashion.
It was after these individual cans were cut, that I started to organize the cut metal into piles of similar size and shape. Beforehand, there was one larger pile along the edge of my sink, of which I decided not to sort through until I had finished cutting, as it would take longer to constantly be trying to organize metal between cutting cans. Yet, after the individual piles had been organized, I began to assemble my flower piece. I decided to simply use glue to mold the pieces together, as I felt that attempting to either weld or tape them together would diminish the overall appearance of the flower. I started assembling this piece by creating the stem, as the general straight structure provided a good starting point for me (especially considering that I had never created a sculpture like this one before). Specifically for the stem, I would glue the backs of the metal, and then push the pieces together very softly to connect them. If certain pieces didn’t connect properly, I would cut them with the scissors again, and attempt to reposition them along the piece. This process continued until all of the stem pieces were combined, after which I then set aside the stem to dry for awhile.
Once the stem had been completed, I began assembling the petal and leaf components of my flower sculpture.To do this, I initially started by taking the scissors, and cutting out the general shape I wanted for either the petals or the leaf along my piece. During this process of cutting the metal cans,I knew that the petals had to be small, as the thin stem had to be big enough to support the remaining portions of the piece.After I had created this petal, I would then proceed to bend this originally flat material until it took a more desirable shape. Generally, these pieces would be bent downwards at one end, while the other end would be pushed inwards to form a “v” structure. These petals were also set aside, but were not glued together until I had all the petals I needed for this piece. Yet the leaf was only glued to the stem of my flower, after the petals had been assembled, as I wanted to ensure I provided enough time for the stem of the sculpture to dry.
Following the complete assemblage of the flower and stem, I combined them together by gluing the top portion of the stem - as well as the bottom portion of the flower - and pressing the two segments together. I then held these pieces together until I felt confident that they wouldn’t fall apart, after which I left the entire piece on my counter to dry for the night.
Experimentation
|
|
Throughout this process, I consistently bent metal in attempts to create a realistic flower for this piece. It was this bending and general manipulation of these aluminum cans that I was able to assemble and experiment with the overall look of my piece. I frequently would change the positioning of the petals and leaves to see which position contributed the most to my sculpture’s overall appearance.
Yet, in addition to this, I also experimented with the metal throughout my piece by burning it over a fire to alter the overall color of the piece. I would burn this metal by simply taking a pair of tongs, and holding the metal over an open flame in my stove. Since aluminum has a low melting point, the metal can easily become manipulated by the fire. Not only did the metal take various shapes throughout the burning process, yet it also would change in color as the aluminum reacted with the flame. Typically, this fire would either change the metal from a solid silver color to either a brown, copper-like, color, or into a white and ashy surface. Both types of change were very interesting to see, while I similarly felt that that change in color made the piece appear more distressed, of which only contributed more to the theme I was attempting to present. After the fire burned the metal to my liking, I would set it aside to cool down for later usage. Although, it was noticeably more difficult to manipulate the materials as I burned it more. Personally I believe this is because the metal would become brittle and significantly more fragile following the burning. This ultimately resulted in some broken pieces of metal throughout my work. |
UWM Critique
Following the creation of my sculpture project, my class and I participated in a gallery at UWM to receive feedback on our work. In general, the UWM representatives liked the theme I presented with my piece, while in contrast they felt my physical work did not reflect the depth of my ideas. More specifically, the UWM judges commented on their appreciation for the complexity within my theme of abuse transforming a relationship, while they also appreciated my presentation of said theme. However, these same representatives noted that my piece did not capture my them, while also stating that the piece was small - but not small enough to seem significant in accordance to my theme - and susceptible to be overlooked. Overall, I agree with the comments I received from the UWM representatives, and am inspired to make changes to my overall piece as they recommended. The altercations I will ultimately make to my piece will be in correlation to the feedback I had on my original sculpture.
Reflection
Considering the fact that I changed my entire sculpture design halfway through the project, I am very happy with the piece I was able to create. The petals are bent nicely, and provide a feminine appearance to the overall piece. Although the stem is a little geometric, and not as refined as it could have been, I am impressed with my ability to assemble this piece despite never creating a sculpture beforehand. Additionally, I feel like this piece noticeably connects to my theme. Originally, during the halfway critique, I was told to make stronger connections between my piece and my theme, and I feel that I have done just that by using bent and burned metal to convey ideas of abuse and hidden intentions within a relationship.
Additionally, when considering my website, I personally feel that I successfully and efficiently captured the process of creating this mixed media piece remarkably well. I also ensured to show a plethora of photographs to capture the process of creating this sculpture, while also showing a process of thought considering my planning sketches, and general ideas for creating a mixed media artwork. However, in the future, I would like my Weebly page to have a little more detail within each section, as I feel that there is somewhat of a general vagueness within the combined portions of my website.
Additionally, when considering my website, I personally feel that I successfully and efficiently captured the process of creating this mixed media piece remarkably well. I also ensured to show a plethora of photographs to capture the process of creating this sculpture, while also showing a process of thought considering my planning sketches, and general ideas for creating a mixed media artwork. However, in the future, I would like my Weebly page to have a little more detail within each section, as I feel that there is somewhat of a general vagueness within the combined portions of my website.
Connecting to the ACT
1) Clearly explain how you are able to identify the cause-effect relationship between your inspiration and its effect upon your artwork.
2) What is the overall approach (point of view) the author (from your research) has regarding the topic of your inspiration?
3) What kind of generalizations and conclusions have you discovered about people, ideas, cultures, etc. while you researched your inspiration?
4) What was the central theme or idea around your inspirational research?
5) What kind of inferences (conclusions based on your evidence and reasoning) did you make while reading your research?
- It is through the heavy usage of metal within Lorenzo Quinn’s work, as well as his typical focus on themes of love, can be reflected within my final work. It was his pieces that allowed me to see what I was able to create while using such rigid materials.
2) What is the overall approach (point of view) the author (from your research) has regarding the topic of your inspiration?
- Throughout my research, I consistently noticed that several authors focused on Quinn's work in other mediums, and how that ultimately paved the way for him to find sculpting. Additionally, several authors focused on his accomplishments instead of the meaning behind his work, of which ultimately hindered the depth I was able to achieve throughout the research process.
3) What kind of generalizations and conclusions have you discovered about people, ideas, cultures, etc. while you researched your inspiration?
- Primarily, I focused on Lorenzo Quinn’s site itself for a source, yet other sources typically seemed most interested in Quinn’s sculptural pieces. I feel that this is primarily due to the fact that Lorenzo focuses on creating sculptures the most, yet also because the process of sculpting shaped his overall approach to becoming and artist.
4) What was the central theme or idea around your inspirational research?
- My central theme or idea around my inspirational research was to find artists that could capture the ideas of love and abuse in unconventional matters. Additionally, I look for artists that were able to showcase a distinct contrast of emotions within a singe piece.
5) What kind of inferences (conclusions based on your evidence and reasoning) did you make while reading your research?
- Following the research process, I was able to conclude that the usage of materials can play a considerable role of the overall theme being presented within the piece. In addition to this, I was able to see that the use of feminine sculptures made out of harsh materials can show a contrast in ideas that are presented within a theme.
Bibliography
Bradley, Paige. “Expansion, Third Life | Bronze with Electricity | 18.5 x 21 x 9.5 in | 47 x 53 x 24
cm.” Expansion | Paige Bradley | Bronze Sculpture, www.paigebradley.com/sculpture/metamorphosis/expansion-third/. Accessed 22 Dec. 2017.
-
“Lorenzo Quinn - Biography.” RoGallery,
www.rogallery.com/Quinn_Lorenzo/quinn-biography.html. Accessed 21 Dec. 2017.
-
Ochayon, Sheryl. “The International School for Holocaust Studies.” Yad Vashem - The World
Holocaust Remembrance Center, www.yadvashem.org/yv/en/education/newsletter/31/shoes.asp. Accessed 19 Dec. 2017.
-
Quinn, Lorenzo. “Biography.” Lorenzo Quinn, www.lorenzoquinn.com/biography/. Accessed 21
Dec. 2017.
-
Quinn, Lorenzo. “DURING LOVE, BRONZE.” Lorenzo Quinn,
www.lorenzoquinn.com/portfolio-items/during-love-bronze-england/. Accessed 21 Dec. 2017.
-
Quinn, Lorenzo. “FINDING LOVE, BRONZE.” Lorenzo Quinn,
www.lorenzoquinn.com/portfolio-items/finding-love-bronze/. Accessed 20 Dec. 2017.
-
Quinn, Lorenzo. “IN PERSPECTIVE.” Lorenzo Quinn,
www.lorenzoquinn.com/portfolio-items/in-perspective-ukraine/. Accessed 18 Dec. 2017.
-
Quinn, Lorenzo. “REACHING FOR GOLD.” Lorenzo Quinn,
www.lorenzoquinn.com/portfolio-items/reaching-for-gold-qatar/. Accessed 21 Dec. 2017.
-
Quinn, Lorenzo. “TIME FLIES.” Lorenzo Quinn,
www.lorenzoquinn.com/portfolio-items/time-flies-ireland/. Accessed 20 Dec. 2017.
-
Quinn, Lorenzo. “THE FORCE OF NATURE II.” Lorenzo Quinn,
www.lorenzoquinn.com/portfolio-items/installations-the-force-of-nature-2/. Accessed 18
Dec. 2017.
